Smart Contract With Polygon

I just want to drink coffee and build stuff
A smart contract is a computer program or a transaction protocol which is self-executing contract with terms of agreement between a buyer and a seller which exists across a distributed, decentralized blockchain network.
Polygon is an Ethereum token that powers the Polygon Network, a scaling solution for Ethereum. This is an alternative to deploying your contracts to Ethereum as it is cost effective and supported on Opensea, which is the largest NFT marketplace. Steps in creating a smart contract in Polygon.
Step 1: Setup in local environment
Setup in local development environment using hardhat, an industry-standard Ethereum development environment which we will use to develop, deploy, and verify our written smart contracts. Open your terminal/command line
mkdir mycollection && cd mycollection && npm init -y
The code above helps you create a directory called contract in your local machine, get into the directory and initialize npm. (Make sure you have Node installed in your computer).
Next install hardhat
npm install — save-dev hardhat
Then run
npx hardhat
Click on enter for a basic sample project, project root and adding .gitignore.

The above image is what it would look like. As you can see, its telling me to install the above dependencies which will be done in order to run the sample script.
After installing the above dependencies, run
npx hardhat run scripts/sample-script.js
And it is successful, we can go ahead and install other dependencies for our smart contract.
npm install @openzeppelin/contracts
Open Zeppelin is a contracts package which will give us access to the ERC721 contracts and some other libraries.
Finally, install dotenv to help you mask your private keys which you would be calling when creating and deploying your contract.
npm install dotenv
Step 2: Writing the contract
This would be done using solidity. Open the folder which you created at the beginning of this tutorial.
Create a new file in the contract folder — mycollection.sol. If you notice that the file type is a plain text, go to your VSCode extension and install the Solidity extension.
//SPDX-License-Identifier: MIT
pragma solidity ^0.8.0;import "@openzeppelin/contracts/utils/Counters.sol";
import "@openzeppelin/contracts/access/Ownable.sol";
import "@openzeppelin/contracts/utils/math/SafeMath.sol";
import "@openzeppelin/contracts/token/ERC721/extensions/ERC721Enumerable.sol";
contract mycollection is ERC721Enumerable, Ownable {
    using SafeMath for uint256;
    using Counters for Counters.Counter;

    Counters.Counter private _tokenIds;
}
Version: v8.0
ERC721Enumerable: implementation contract for NFT collections.
Ownable: Allows for administrative privilege.
SafeMath and Counter: Safety net for dealing with unsigned integer and token IDs.
Right under the _tokensID declaration, add
uint public constant MAX_SUPPLY = 400;
uint public constant PRICE = 0.01 ether;
uint public constant MAX_PER_MINT = 3;

string public baseTokenURI;
MAX_SUPPLY: The maximum number of NFTs that can be minted in your collection.
PRICE: The amount of ether required to buy 1 NFT.
MAX_PER_MINT: The upper limit of NFTs that you can mint at once.
Base Token URI: The IPFS URL of the folder containing the JSON metadata.
We will have a constructor which we would be calling for setting the name and symbol for our collection.
Setting the baseTokenURI to our constructor:
constructor(string memory baseURI) ERC721("mycollection", "MCN") {
     setBaseURI(baseURI);
}
As the creator, you will probably want to reserve a few NFTs of the collection for yourself, your team, and for events like giveaways. We will be writing a function that will allow us mint some, in our case 10 which we would mark as onlyOwner to give us administrative access to calling this contract.
function reserveNFTs() public onlyOwner {
     uint totalMinted = _tokenIds.current();     require(
        totalMinted.add(10) < MAX_SUPPLY, "Not enough NFTs"
     );     for (uint i = 0; i < 10; i++) {
          _mintSingleNFT();
     }
}
tokensIds.current(): Check total number of NFTs minted currently.
_mintSingleNFT: To mint 10 NFTS if there’s enough left in the collection for us to reserve.
We would set our base token URI, this JSON metadata is available in IPFS, in my case: “ipfs://QmUZJxtWp5xJc9YFd87E9dZkuMTTTrLCL7vcakHAgae7FW/”.
Make sure that it’s the right URI and there’s no .json at the end of your file.
function _baseURI() internal
                    view
                    virtual
                    override
                    returns (string memory) {
     return baseTokenURI;
}

function setBaseURI(string memory _baseTokenURI) public onlyOwner {
     baseTokenURI = _baseTokenURI;
}
baseTokenURI: function that tell the contract the base URI we defined which overrides the _baseURI() function and returns our defined variable.
To the main minting function for users and customers.
function mintNFTs(uint _count) public payable {
     uint totalMinted = _tokenIds.current();     require(
       totalMinted.add(_count) <= MAX_SUPPLY, "Not enough NFTs!"
     );     require(
       _count > 0 && _count <= MAX_PER_MINT,
       "Cannot mint specified number of NFTs."
     );     require(
       msg.value >= PRICE.mul(_count),
       "Not enough ether to purchase NFTs."
     );     for (uint i = 0; i < _count; i++) {
            _mintSingleNFT();
     }
}
Since they’re sending ether to this function, we have to mark it as payable. We need to make three checks before we allow the mint to take place:
- There are enough NFTs left in the collection for the caller to mint the requested amount.
- The caller has requested to mint more than 0 and less than the maximum number of NFTs allowed per transaction.
- The caller has sent enough ether to mint the requested number of NFTs.
function _mintSingleNFT() private {
      uint newTokenID = _tokenIds.current();
      _safeMint(msg.sender, newTokenID);
      _tokenIds.increment();
}
The _mintSingleNFT() function that is called results in:
- Getting the current ID that hasn’t been minted yet.
- Using the _safeMint() function already defined by OpenZeppelin to assign the NFT ID to the account that called the function.
- Incrementing the token IDs counter by 1
In case of giving any sort of utility to your collection holders, you will have to know which NFTs are being held from your collections by users.
function tokensOfOwner(address _owner)
         external
         view
         returns (uint[] memory) {     uint tokenCount = balanceOf(_owner);
     uint[] memory tokensId = new uint256[](tokenCount);     for (uint i = 0; i < tokenCount; i++) {
          tokensId[i] = tokenOfOwnerByIndex(_owner, i);
     }

     return tokensId;
}
balanceOf: The number of tokens a particular account holds.
tokenOfOwnerByIndex: Gets all IDs an account owns
Finally, we would want to be able to withdraw the contract’s entire balance which will be marked as onlyOwner
function withdraw() public payable onlyOwner {
     uint balance = address(this).balance;
     require(balance > 0, "No ether left to withdraw");     (bool success, ) = (msg.sender).call{value: balance}("");
     require(success, "Transfer failed.");
}
And we have written our smart contract. All together mycollection.sol looks like this:
//SPDX-License-Identifier: MIT
pragma solidity ^0.8.0;

import "@openzeppelin/contracts/utils/Counters.sol";
import "@openzeppelin/contracts/access/Ownable.sol";
import "@openzeppelin/contracts/utils/math/SafeMath.sol";
import "@openzeppelin/contracts/token/ERC721/extensions/ERC721Enumerable.sol";

contract mycollection is ERC721Enumerable, Ownable {
    using SafeMath for uint256;
    using Counters for Counters.Counter;

    Counters.Counter private _tokenIds;

    uint public constant MAX_SUPPLY = 400;
    uint public constant PRICE = 0.01 ether;
    uint public constant MAX_PER_MINT = 3;

    string public baseTokenURI;

    constructor(string memory baseURI) ERC721("mycollection", "mcn") {
        setBaseURI(baseURI);
    }

    function reserveNFTs() public onlyOwner {
        uint totalMinted = _tokenIds.current();

        require(totalMinted.add(10) < MAX_SUPPLY, "Not enough NFTs left to reserve");

        for (uint i = 0; i < 10; i++) {
            _mintSingleNFT();
        }
    }

    function _baseURI() internal view virtual override returns (string memory) {
        return baseTokenURI;
    }

    function setBaseURI(string memory _baseTokenURI) public onlyOwner {
        baseTokenURI = _baseTokenURI;
    }

    function mintNFTs(uint _count) public payable {
        uint totalMinted = _tokenIds.current();

        require(totalMinted.add(_count) <= MAX_SUPPLY, "Not enough NFTs left!");
        require(_count >0 && _count <= MAX_PER_MINT, "Cannot mint specified number of NFTs.");
        require(msg.value >= PRICE.mul(_count), "Not enough ether to purchase NFTs.");

        for (uint i = 0; i < _count; i++) {
            _mintSingleNFT();
        }
    }

    function _mintSingleNFT() private {
        uint newTokenID = _tokenIds.current();
        _safeMint(msg.sender, newTokenID);
        _tokenIds.increment();
    }

    function tokensOfOwner(address _owner) external view returns (uint[] memory) {

        uint tokenCount = balanceOf(_owner);
        uint[] memory tokensId = new uint256[](tokenCount);

        for (uint i = 0; i < tokenCount; i++) {
            tokensId[i] = tokenOfOwnerByIndex(_owner, i);
        }
        return tokensId;
    }

    function withdraw() public payable onlyOwner {
        uint balance = address(this).balance;
        require(balance > 0, "No ether left to withdraw");

        (bool success, ) = (msg.sender).call{value: balance}("");
        require(success, "Transfer failed.");
    }

}
Make sure to delete the Greeter.sol file.
Step 3: Deployment
We will first test our contract by deploying locally on our machine. To do that, we would create a file in our script folder named run.js
const { utils } = require("ethers");
async function main() {
const baseTokenURI = "<-- IPFS metadata -->";
// Get owner/deployer's wallet address
const [owner] = await hre.ethers.getSigners();
// Get contract that we want to deploy
const contractFactory = await hre.ethers.getContractFactory("mycollection");
// Deploy contract with the correct constructor arguments
const contract = await contractFactory.deploy(baseTokenURI);
// Wait for this transaction to be mined
await contract.deployed();
// Get contract address
console.log("Contract deployed to:", contract.address);
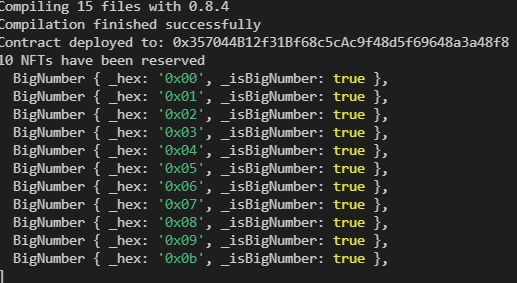
// Reserve NFTs
let txn = await contract.reserveNFTs();
await txn.wait();
console.log("10 NFTs have been reserved");
// Mint 3 NFTs by sending 0.03 ether
txn = await contract.mintNFTs(3, { value: utils.parseEther('0.03') });
await txn.wait()
// Get all token IDs of the owner
let tokens = await contract.tokensOfOwner(owner.address)
console.log("Owner has tokens: ", tokens);
}
main()
.then(() => process.exit(0))
.catch((error) => {
console.error(error);
process.exit(1);
});
Code summary:
- We get the address of the deployer/owner (us).
- We get the contract that we want to deploy.
- We send a request for the contract to be deployed and wait for a miner to pick this request and add it to the blockchain.
- Once mined, we get the contract address.
- We then call public functions of our contract. We reserve 10 NFTs, mint 3 NFTs by sending 0.03 ETH to the contract, and check the NFTs owned by us. Note that the first two calls require gas (because they’re writing to the blockchain) whereas the third simply reads from the blockchain.
Let’s give this a run locally.
npx hardhat run scripts/run

Success!!!
Deploying to Polygon:
Create a .env file and have the following snippet in it.
API_URL = ""
PRIVATE_KEY = "<-- Metamask wallet private key -->"
POLYGONSCAN_KEY = ""
POLYGON_URL = ""
This is being deployed in the testnet, feel free to leave the API_URL blank. Next, we would install the package that makes it easy for us to verify our contract on Etherscan.
npm install @nomiclabs/hardhat-etherscan
Then replace our hardhat.config.js with the following snippet:
require("@nomiclabs/hardhat-waffle");
require("@nomiclabs/hardhat-etherscan");
require('dotenv').config();

const { API_URL, PRIVATE_KEY, POLYGONSCAN_KEY, POLYGON_URL } = process.env;

// This is a sample Hardhat task. To learn how to create your own go to
// https://hardhat.org/guides/create-task.html
task("accounts", "Prints the list of accounts", async (taskArgs, hre) => {
  const accounts = await hre.ethers.getSigners();

  for (const account of accounts) {
    console.log(account.address);
  }
});

// You need to export an object to set up your config
// Go to https://hardhat.org/config/ to learn more

/**
 * @type import('hardhat/config').HardhatUserConfig
 */
module.exports = {
  solidity: "0.8.4",
  networks: {
    rinkeby: {
      url: API_URL,
      accounts: [PRIVATE_KEY]
    },
    mumbai: {
      url: POLYGON_URL,
      accounts: [PRIVATE_KEY]
    }
  },
  etherscan: {
    apiKey: POLYGONSCAN_KEY
  }
};
Next is to add Polygon and Polygon MUMBAI to our Metamask. This short documentation guides you on it.
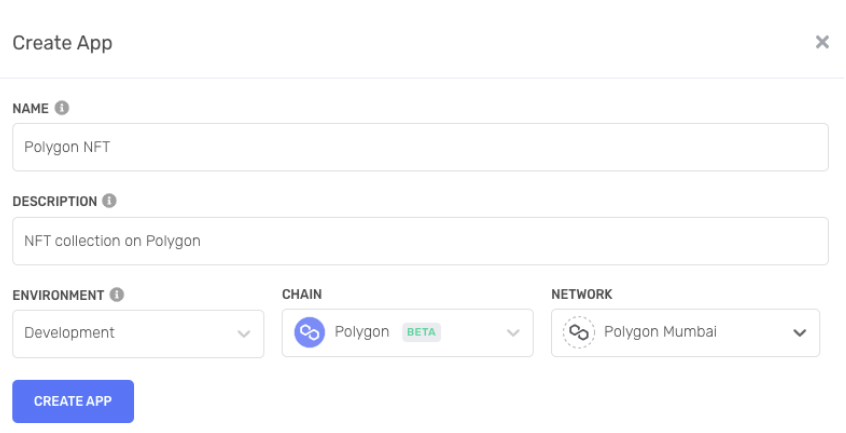
Then go to Alchemy and create an account. The reason we are using Alchemy is because we are creating a custom RPC.
Next, create an App by setting the chain to Polygon and the network to Mumbai, click on VIEW KEY for your app and get the HTTP URL. Go back to your .env file and fill in the value for POLYGON_URL
Next is to get a fake MATIC for testing our contract. You can get it from the faucet . We are ready to go. Run
npx hardhat run scripts/run.js — network mumbai
And it’s been deployed.
On Alchemy, this is what it would look like:
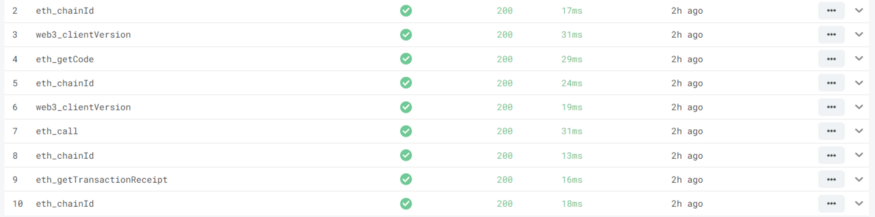
We can confirm by checking Polygonscan and typing in the contract address.

You can see the transaction on the attached image above.
Go to the Openasea testnet and type in the same contract address and you would see that your collection has been uploaded.
Finally, we verify our contract to enable our users be able to mint from Polygonscan directly.
- Signup for an account on Polygonscan .
- Create your API key.
- Update your .env file with the API key for POLYGONSCAN_KEY
Your updated .env file should look like this:
API_URL = ""
PRIVATE_KEY = "<-- Metamask wallet private key -->"
POLYGONSCAN_KEY = "<-- POLYGOSCAN API -->"
POLYGON_URL = "<-- Alchemy Polygon URL -->"
Finally, run
npx hardhat clean
Next
npx hardhat verify --network mumbai DEPLOYED_CONTRACT_ADDRESS "constraint"
Deployed_contract_address: This is the address of your transaction on polygon. Constraint: This is the address of your JSON metadata on your IPFS. (In the event it throws and error, remove the "constraint").
In my case
npx hardhat verify — network mumbai 0x357044B12f31Bf68c5cAc9f48d5f69648a3a48f8 "ipfs://QmUZJxtWp5xJc9YFd87E9dZkuMTTTrLCL7vcakHAgae7FW/"
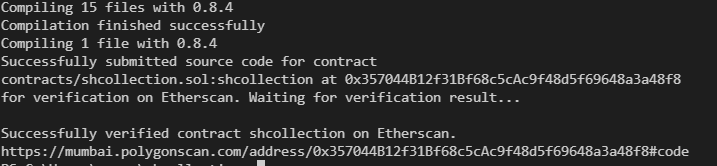
Successfully verified contract. There should be a green checkmark on your contract tab.
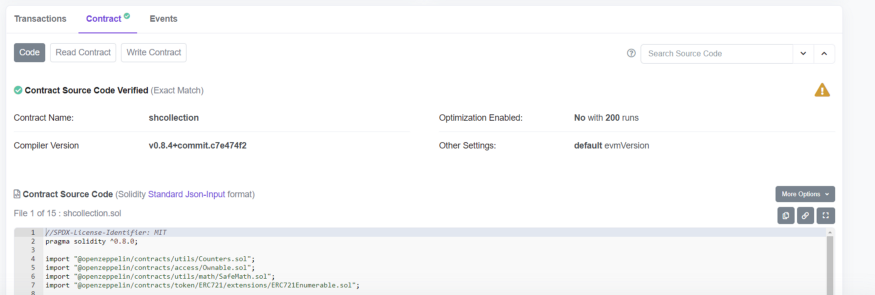
Conclusion:
We now have our smart contract deployed on Polygon and our users can mint the NFT in our collection.
Note:
- This is a test environment, to mint using the real environment, you have to use real MATIC currency by purchasing one.
- You will need a user interface for your users to mint by a click of a button.
The repository of this code can be found here and you can connect with me on LinkedIn.


